To create a pastel, Wes-Anderson-style beach photo in Lightroom, you need 3 things: a simple scene with a limited color palette, hard midday sunlight, and a soft, low-contrast color grade in Lightroom using HSL and Color Grading.
The steps below form a reusable Pastel Beach Lightroom Method you can apply to any suitable image and build on top of your existing Lightroom workflow.


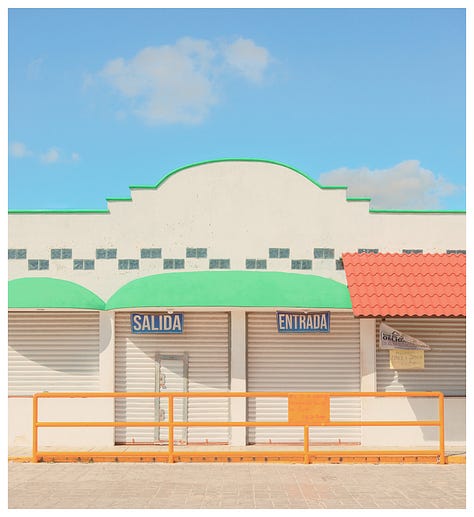
What kind of scene works best for pastel beach photos?
Pastel color grading only works well if the raw photo is already clean and minimal.
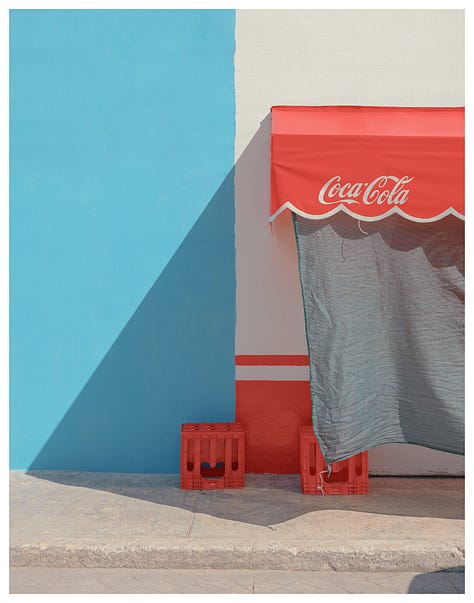
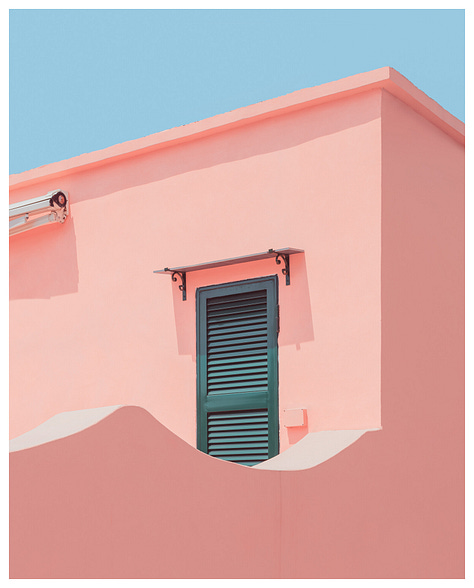
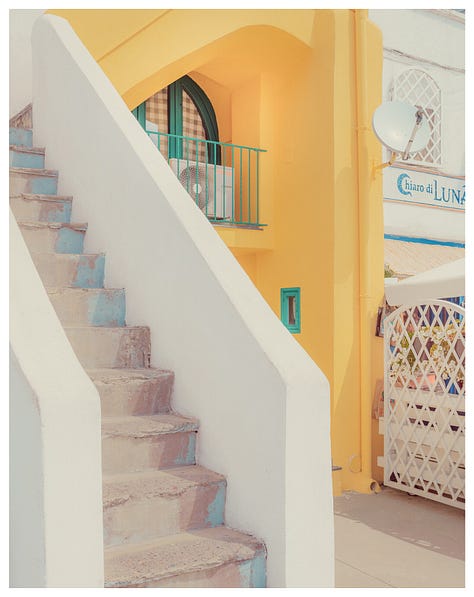
The style shares a lot with the locations featured in the “Accidentally Wes Anderson” photo book breakdown, where color blocks and simple shapes carry the frame.
Look for:
Subjects with simple shapes
Flat walls, lifeguard huts, beach kiosks, or facades similar to the graphic scenes in your favorite travel spots. If you need ideas, the locations section in Travel Photography Tips pairs nicely with this style.Surfaces painted in solid colors
Think blue, red, yellow, white, and sand tones.Very little clutter
Avoid cars, trash bins, busy clothing, and random signage.Strong geometric lines and shadows
Stairs, railings, roofs, awnings.A tight color palette
Aim for three or four main colors that repeat through the frame.
If the scene has many mixed colors and distractions, color grading becomes correction instead of creative work. For more help simplifying frames, the composition ideas in Powerful Composition Techniques for Photography are a good companion read.
What lighting should I use?
For pastel beach photos, soft golden-hour light is less useful than hard, cloudless midday sun.
Hard sun gives you:
Sharp, graphic shadows that look almost illustrative
Strong, natural saturation that you can then soften into pastels
Even lighting on flat surfaces like walls and sand
Soft overcast light tends to produce muddy midtones and low separation between colors, which makes pastel edits feel flat rather than clean.
If you are not yet comfortable exposing in bright light, review the exposure advice inside the Ultimate Photography Guide for Beginners before you experiment.
How should I expose in camera?
For this look, expose slightly brighter than a standard “correct” exposure.
Recommended approach:
Use exposure compensation of +0.3 to +0.7 EV
Watch the histogram and avoid clipping important highlights
Aim to “expose to the right” without losing texture in sand, sky, or painted walls
Benefits:
Deep shadows are reduced, which supports the pastel feel
Midtones open up and give more room to grade
Blues, reds, and yellows move toward a brighter, softer starting point
If you are coming from phone photography and switching to a camera, the transition tips in iPhone to Camera: A Practical Guide can help you control exposure with confidence.
What Lightroom settings create a pastel look?
Use these values as a starting recipe in Lightroom Classic or Lightroom Desktop.
Every image will need small tweaks, but this will put you in the right ballpark.
1. Basic Panel
Exposure: +0.30 to +0.60
Contrast: -20
Highlights: -40
Shadows: +35
Whites: +10
Blacks: +25
Texture: -10
Clarity: -10
Dehaze: -10
These settings flatten harsh contrast from the sun while keeping the file clean rather than foggy.
If your machine struggles while editing large batches of beach photos, tune your software setup using the Lightroom Desktop Performance Guide.
2. Tone Curve
Create a gentle S-curve:
Lift the black point slightly for softer shadows
Pull the top whites down a little to avoid harsh specular highlights
Keep the midtones smooth with only a mild curve
Result: the image retains shape and depth without harsh contrast spikes.
3. Color Mixer (HSL)
Most of the pastel feel comes from targeted HSL work rather than global saturation changes.
Blues - sky, painted walls, sea
Hue: -10 (shifts toward cyan)
Saturation: -20
Luminance: +20
Reds - awnings, crates, signage
Hue: +5
Saturation: -5
Luminance: +10
Yellows - sand, flags, some skin tones
Hue: +20
Saturation: -10
Luminance: +15
These numbers move strong primary colors into a softer, pastel range while keeping them readable.
If color casts appear in your whites or skin tones, the workflow from Fix Yellow Tint in Photos shows how to clean those without losing warmth.
4. Color Grading
Use Lightroom’s Color Grading panel to tilt the mood:
Shadows: cool cyan or teal with low saturation around 10–15
Highlights: warm peach or pale yellow with very low saturation around 5–10
Midtones (optional): reduce saturation slightly if colors still feel too bold
This cool-shadow and warm-highlight combination gives a dreamy look without cranking vibrance.
If you notice halos around high-contrast edges after grading, the solutions in the Lightroom Halo Effect Guide will help you clean them.
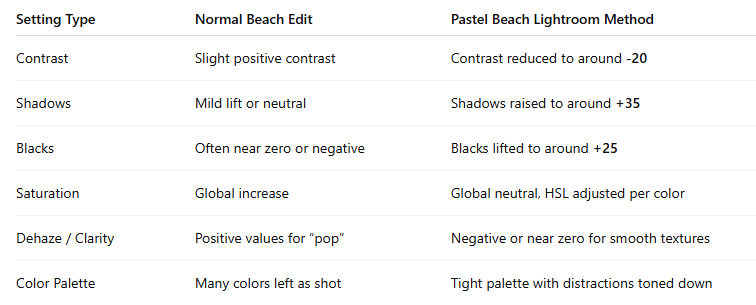
How does this differ from a normal beach edit?
You can use this table when comparing a standard travel shot from Best Travel Cameras against a pastel treatment of the same scene.
How do I keep the color palette tight?
Pastel photos work best when every color feels deliberate. If one hue stands out and breaks the harmony, adjust that specific color instead of reaching for global saturation.
For any distracting color:
Lower its saturation in the HSL panel
Raise its luminance a little so it feels lighter and less dominant
Nudge the hue closer to neighboring tones in the scene
Example: a neon green bin on a pastel beach
Green saturation: about -40
Green luminance: about +20
Green hue: shift slightly toward yellow
After that, the bin blends with the palette instead of hijacking attention.
What are the most common mistakes with pastel edits?
Mistake 1: Lifting shadows too far
Symptom: image looks gray and flat.
Fix: lower blacks and shadows slightly until you regain separation, then re-check contrast.
Mistake 2: Heavy dehaze or clarity
Symptom: crunchy textures that fight the smooth, painted look.
Fix: keep Texture, Clarity, and Dehaze slightly negative or close to zero.
Mistake 3: Only changing global saturation
Symptom: some colors look perfect while others turn neon.
Fix: rely on the HSL panel to treat each color channel individually.
If you catch yourself making several of these at once, a quick reset and a slower, step-by-step approach like the one in 14 Essential Tips To Master Your Photography can bring the file back on track.
How can I practice this pastel Lightroom workflow?
A simple practice routine:
Choose a clean scene
A café facade, lifeguard tower, or colorful wall with three to four main colors.Shoot in strong sun
Late morning to mid-afternoon on a cloudless day.Expose slightly to the right
Use +0.3 to +0.7 EV and check the histogram.Apply the Pastel Beach Lightroom Method
Work in this order: Basic panel, Tone Curve, HSL, then Color Grading.Export a before-and-after comparison
Note which sliders created the biggest shift so you can repeat it on future shoots.
If you want extra structure, you can pair this practice with the project ideas inside the Ultimate Photography Guide for Beginners so every session has a clear goal.
Your Next Move
If this pastel workflow sparked ideas for your own photos, the easiest way to keep growing is to get one new, practical photography lesson in your inbox each week.
The Photocultivator newsletter sends free, field-tested tips on gear, editing, and real-world shooting so you always have something new to try the next time you pick up your camera.
—Hakan | Founder, PhotoCultivator.com


